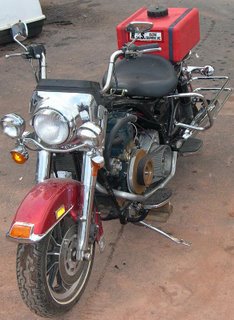
 The appearance has changed dramatically over the past two weeks. Adding the seat, fuel cell, left floor boards, saddlebag mounts, exhaust pipe and muffler have it looking like a motor cycle again.
The right floor board, rear master cylinder and pedal still need to be mounted. I've built the brackets that need to be welded in place, but haven't got the welding done yet. The front engine guard uses the foot peg bracket as a mount, so some modification to that system will also be needed. Before the bike is finished, the frame will need to be reinforced where it was cut for oil pan clearance. The master cylinder won't mount like it did before, but I have provided space for it.
The seat is a solo police saddle from eBay. A solo saddle is necessary to allow room for the 11 gallon RJS fuel cell. I think the fuel cell was a close-out sale since I don't see it listed on line anymore. At $100 including shipping, it was the right tank at the right time. The cell has it's own subframe which attaches to the motorcycle frame in front and the luggage pad in the back. The cell with it's subframe attached can be removed from the bike with four bolts. This allows the cell and saddle to be removed and replaced with the original saddle and passenger back rest.
 The plan is to put a storage compartment and "desk up front. Where there once was a Harley Davidson fuel tank I hope to have access to anything I need while riding and most of the things that I shouldn't have to get off the bike to use. The desk hasn't been designed yet, but I'd really like to have a laptop or tablet PC under a piece of Lexan so I can see a better map than the GPS provides.
The muffler and tailpipe worked out well. I'm using one stock Harley muffler. I still have an entire exhaust system from the orgininal bike for sale. The set that is for sale has aftermarket mufflers. These are fishtail pipes and while louder than stock are not completely open.
The belt guard for the primary drive will probably need to have a notch in it to accomodate the exhaust pipe. The pipe runs close enough to the flywheel that it will be easier to notch it than make the complex bends needed to keep the exhaust pipe outside the guard.
 The last picture shows a closeup of the left side of the engine. I've shown views similar to this several times. This side of the engine has needed the most work. I should do something about the surface rust that's starting to appear on nearly all of the exposed surfaces, but that task will have to wait until it gets disassembled again. One of the things that the "Chopper" shows get right is that the bike gets completely assembled, then is taken apart so the parts can be painted/finished. Final assembly isn't done until everything has been test fitted at least once. In the case of this bike, I'm pretty sure I need to finish the wiring before that diassembly occurs.
I hope to make another update within a week. Thanks for everyone's support. I've received some great suggestions from those who have seen this. I don't always (well, hardly ever) follow the suggestions, but I do consider them. One of the learning points from this project is that there are a lot more ways to do something wrong than there are ways to get it to work.

0 Comments:
Post a Comment
<< Home